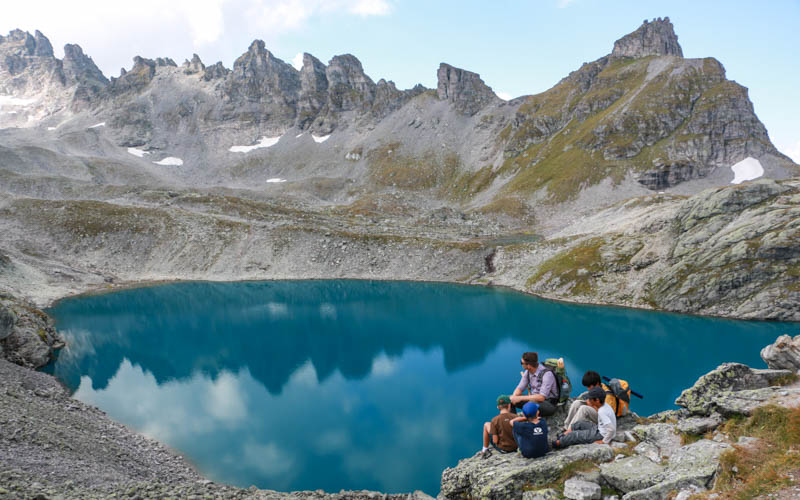
This trail visits several gorgeous alpine lakes in the mountains near Davos. Best to hike here on a sunny day, when the sun makes the water shine a super bright blue.
It’s a steep climb through a rocky landscape to reach these lakes (and a steep climb down). It’s not particularly dangerous. But it does have one short section with a steep slope on one side and a chain handrail for safety. Best to experienced hikers with good fitness. Not suitable for small children.
Despite how tough this trail is, it’s a popular hike so you won’t be alone. But there’s plenty of room to spread out, don’t worry. Make sure to bring lots of water and energizing snacks, as there are no services along the way.
Since this hike doesn’t require mountain transport, it’s free and you aren’t limited by operating hours. But because of the high elevation, weather can change here fast and snow can linger here into July. So check the forecast and conditions carefully before heading out.
Contents
| Region: | Davos, Graubünden, Switzerland |
| Start/End: | Wägerhus/Abzw. Jöriseen bus stop |
| Car: | Parking: Parking Wägerhüttä (46°45’56.3″N 9°56’26.8″E) about 1hr50 from Zürich |
| Public transport: | Bus stop: Wägerhus/Abzw. Jöriseen about 2hr40 from Zürich HB |
| Trail: | 10.8 km loop (6.75 mi) / 5 hours |
| Elevation: | highest point 2757m |
| Skill: | challenging red/white mountain trail, Swiss trail rating T3 |
| Condition: | narrow footpath, one short section with cables, no strollers |
| Services: | no services along the trail |
| Cost: | free |
| Open: | July to mid-October, weather dependent |
| More info: | davos.ch • nearby webcam • wegwandern.ch |
Trail map
Here is the trail map. After 1km, the trail splits and becomes a loop. We hiked counterclockwise, which I think it better because the climbs are steeper that direction, which I prefer to do uphill. But lots of people were walking both directions.
No services along the trail, so bring plenty of water (at least 1L per person) and food. We were on the trail for about 6 hrs, including about 4hr walking time and lots of breaks along the way.
How to get there
This hike is located in southeast Switzerland, near Davos. You can access this hike by car or bus, no mountain transport required.

The trail starts right on the side of the road at the bus stop and parking.
By car:
Drive to Davos, then follow signs to the Flüelapass. About 10 mins from Davos, there is a small parking lot on the side of the road at Wägerhus (46°45’56.3″N 9°56’26.8″E), as shown in the picture below. If that lot is full, drive until you find a spot on the side of the road.

By public transport:
Take a train to Davos, then a bus to Wägerhus/Abzw. Jöriseen bus stop. This bus runs only a few times a day.
Planning your day
Services
There are no services along the trail – no hut, no drinkable water, no toilet. If you need picnic supplies, stop in Davos before coming up to the trail. There is a Coop grocery right next to the Davos train station (Bahnhofstrasse 1, 7270 Davos).
What to bring
Bring 2 liters of water per person and any food you might want during the hike. I suggest hiking sticks, but you may want rubber tips instead of spikes since most of the trail is rocks, not dirt. Bring your first aid kit, including a space blanket to keep warm in case you need to wait for a rescue. For emergencies, you should be a patron of the Rega Swiss Air Rescue service, download their mobile app and turn on location tracking during your hike.
What to wear
This is a high elevation hike with very uneven, demanding terrain. Wear sturdy hiking shoes with good tread. Weather may change quickly so bring layers including a fleece for warmth and rain jacket.
Video of hike
Watch a video of our hike on YouTube:
Photo story of trail
1. Start of trail at Wägerhaus
Here is the start of the trail at the Wägerhaus bus stop. There is a house here but it’s private not a hut. Follow signs to Jöriseen.

Looking back down the trail toward the parking.

After about 1km (20 mins), you reach a split in the trail. From here it’s a loop so it doesn’t matter which way you go. We took the trail to the right and came back on the trail on the left. In retrospect, I think this was the right decision because the trail on the right is much steeper and would have been more difficult coming down that going up.

The trail is extremely rocky.

Looking back down the trail toward Davos.

This flat bit was a short rest for the steep climb that just get steeper the closer you get to the top.

2. Winterlücke – end of the first climb
There were lots of happy faces at Winterlücke 2787m, the end of the long climb of 3.2km, gaining about 560m of elevation. It took my husband and I about 1 hour. Now it’s relatively easy hiking for the next hour or so. This area has three little lakes that are worth visiting. None of the lakes here have names – all just referred to as the Jöriseen.

The trail doesn’t go right next to the water, but we left the trail to get some reflection pics.


3. Continue trail to farthest lake
The trail continues straight ahead to that super blue lake in the distance.

To your left, you’ll get your first view of the last lake on the trail. You’ll wrap around and get there later.

Continue following the trail straight ahead.

Now down to the farthest lake on the loop, your half-way point. It took us about 2hrs to get here.

Lots of people have their picnics here but I prefer the next lake.

4. Hike to last lake
Now you are looping back towards the start, visiting one more lake before you go.

I think this lake is the best of the bunch.

The color is amazing when the sun hits it.

Lots of room to spread out around here and enjoy a little quiet on the lake shore.

We had our picnic near the waterfalls that spill over in the next valley.

A last look before taking on the last climb of the trail.

5. Last climb up to Jöriflüelafurgga
Now you face a very steep climb up from the last lake to Jöriflüelafurgga at 2725m. It’s only about 1km but you gain 200 elevation gain. So the grade is about 20% for the whole climb. It took us about 25 minutes. I was glad I was going up and not down because it would have been quite slippery.

I turned around a lot to take breaks and soak in more of those beautiful lakes.

Almost to the end of the climb.

A short section with cables to hold on to as you climb. It’s a steep drop off on the sides so you should be very careful on this part. I saw one person turn around when they saw this and take a different path down to the lake.

Looking down this cabled part. It’s hard to show the steepness. I felt a little nervous but not afraid.

You made it! Top of of the last climb. It’s all downhill from here.

Here’s the one pic you have to take. You worked hard to pose here.

6. Back down the mountain to the end
Now the relatively easy down back to your car, a little over 3km and about 500m elevation descent. It took us about an hour. This trail is much milder than the other side of the loop. So happy we chose this direction to hike the loop.

See what I mean? Not too hard on the way down.

Big mountain views, a nice hike end to a great hike.

Now the parking is in view and you’re almost done!

I hope you like it! If you do it, please come back and leave a comment to let me know what you think.
Another nice hike in this area: Davos panorama trail
Another hike to lots of alpine lakes: Pizol 5 Lake Hike


6 responses
Hi Tanya!
We made it! Our kids did it very well but I would say better for kids over 10 or so.
Thanks a lot for all your explanations, the were very helpful! Specially the counterclockwise route.
Looking forward to the next one!
I agree, better done with older kids as I mentioned in my post. It takes a lot of endurance and a couple parts are dangerous. Glad you enjoyed it.
Hi Tanya
Thanks for the amazing explanations! We are considering doing it tomorrow. One question: is it possible to begin the way back without doing the last part upwards? The one with the cables. I’m a bit concerned about my 8 year old boy. He hikes very well but has no fear and tends not to be sufficiently cautious.
Thanks!
Ingrid
Sorry I’m replying so late. I don’t know if there is a trail that avoids the cables. It’s probably the safest way up that rock face.
Absolutely fantastic hike! Challenging, but so beautiful and rewarding. I agree that the counterclockwise route seemed to be the best choice, saving the nicest lake for last. Thank you so much for recommending it and for the very helpful notes.
Glad you enjoyed it! And good to know you agree on the direction. I was wondering about this.